Introduction
A new year has started (best wishes to all of you in 2022!) and what better moment to keep your new years resolution of finally getting rid of some of your technical debt. In my case, this meant finally converting my Rancher installation from a Single Node Docker container to an installation running K3s cluster.
Back when Rancher v2.0.0 was released, there were two options for installation. Either you ran it as a Single Node Docker container or installed on an RKE Kubernetes cluster (a HA-cluster being the recommended way by Rancher Labs for production workloads). With the release of Rancher 2.4.0 this has been expanded to include K3s clusters and as of v2.5.0 any CNCF certified Kubernetes distribution is supported.
Since I was still new to Kubernetes back then and had no idea how to set up a cluster, I went with a Single Node Docker install. Up until Rancher v2.5.0 you were actually stuck with this choice. There was no way to migrate your Single Node Docker container to a Kubernetes cluster. However, with the release of v2.5.0, migrating your Rancher installation is now officially supported using the backup-restore-operator. In this guide, I'll show you all the steps I've taken to do so and explain how you too, can migrate your Rancher installation from a single node docker install to a single node or even a highly available Kubernetes cluster*.
This guide will be written with fairly new users of Kubernetes/Docker/Linux in mind, so it will be rather extensive. It however does contain a few tips/gotchas that even more experienced users should find helpful executing this migration. I will also avoid using any cloud services (specifically S3 buckets) that you might not have available. Without further a do, let's get started.
* This guide will cover how to migrate your Rancher from a single node docker installation into a single node K3S cluster. I will however point out where other steps will have to be taken in order to setup a highly available cluster.
Prerequisites
Right, let's start with the thing's you'll need to have available for you to execute this migration.
Time: 1 hour - 1.5 hour
Must have:
- Rancher 2.5.0 and up running as a single node docker install (older versions are not supported for this method, you'll have to update first.)
Tip: If you're not running Rancher 2.5.x yet, I highly recommend updating from the latest 2.4.x (2.4.15 as of writing) straight to v2.5.8 or higher, skipping 2.5.0-2.5.7. As of Rancher 2.5.0, rancher installs Rancher Fleet into downstream clusters and I've found that the earlier 2.5.x versions had some issues in doing so reliably after updating. All my updates from v2.4.x to 2.5.8 (and up) however have gone flawlessly.
- Access to the DNS records of your Rancher domain. This is ONLY required IF you're changing the IP/node. Your migrated installation is required to use the same domain as your current installation as Rancher doesn’t support changing this.
- SSH access to the node Rancher is running on either as
rootor a user that can usesudo(without password, more on that later) - Access to the
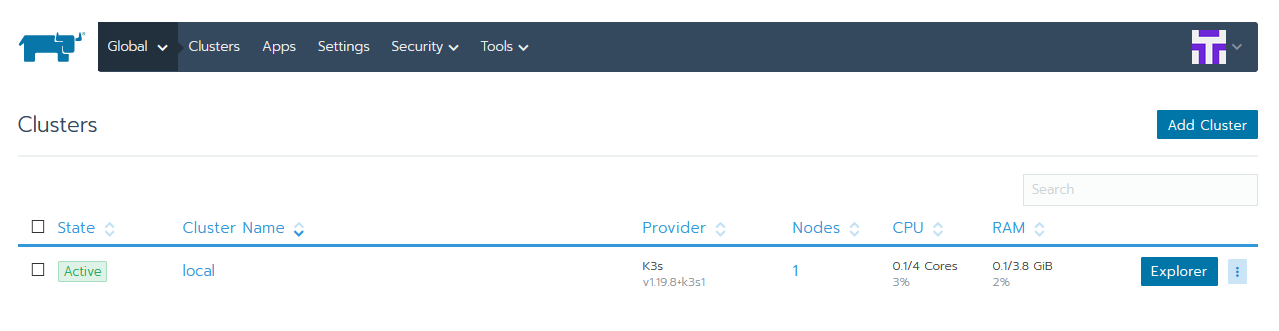
localcluster through the UI Access to thelocalcluster through the UI. If you're not running 2.5.x yet, you probably have never seen this before. But as of 2.5.0 Rancher actually. lists the cluster on which it’s installed aslocal.This is the case even for Single Node Docker installation as Rancher sets up a K3S cluster inside the docker container in order to run. Pretty neat huh? - kubectl (v1.20.x - v1.22.x at the time of writing) on your local machine (the one inside the Rancher Interface won't cut it here as we'll be using it once Rancher is down for the migration) - this is the Kubernetes command-line interface
- helm v3.2.x or higher (lower versions cause issues) - package management for Kubernetes
- A node to install K3S on as a single node cluster (this can be the node on which Rancher is currently installed
Optionally:
- An S3 bucket, preferably with a valid HTTPS certificate (can be Amazon or Minio). If you have a bucket you can use, that will make your life easier. If you have one but without a valid certificate, you can still use it, but it will not be covered in this guide how to do so. I will however link to resources where you can find out how to do so.
Note: Even though backup-restore-operator supports using different StorageClasses other than S3 for it's back-ups, the documentation on using them for restores is scarse. Unless you can download the back-up manually to use it for the restore later, I wouldn't recommend going down this route. If you do use a different StorageClass, make sure it's Reclaim Policy is set to "Retain". This will prevent the PV from being deleted if the PVC from rancher-backup chart gets deleted.
What we'll be doing
- Make a back-up of the current single node docker install as a last resort in case stuff goes wrong (in a way that we can restore to a single node docker install if needed)
- Install the Rancher backup-restore-operator (BRO)
- Create a Persistent Volume for BRO to store the back-up
- Extract the back-up from the Rancher container (Because Rancher in a single node docker container runs on what's effectively a K3s cluster inside a Docker container, the notion of HostPath writing to the host is lost. As far as Rancher is concerned, the container is the host. Thus this extra step is required to acquire the back-up)
- Create a one-time back-up using BRO that will be used for the migration
- Setting up a new cluster (optional if you already have one prepared) to migrate Rancher to. This can be your current host.
- Preparing the new cluster for restore
- Restore the BRO back-up, reinstall Rancher into the new cluster and verify everything works. Restoring the back-up only restore the data from your Kubernetes data store, but not the actual workloads from the
localcluster. Hence we have to reinstall Rancher after restoring the back-up. - Clean-up backup-restore-operator and the persistent volume we used
- Extra: Update Rancher to 2.6.3
1. Creating a back-up
Before we do anything else, let's make a back-up of our current single node docker install. That way, in case anything goes wrong, we'll have something to return to. Rancher actually has an excellent guide on how to do this:
https://rancher.com/docs/rancher/v2.x/en/backups/v2.5/docker-installs/docker-backups/
Note: This back-up will only serve as a last resort to restore your current single node docker install if something goes wrong. This back-up can not be used to migrate your SND install to a kubernetes cluster.
Important: Copy the back-up from your node to your local machine or secure it elsewhere. That way if something goes horribly wrong with the node, you won't be locked out of your back-up.
If you don't know how to do so, you can use rsync for it. If you've only ever used the older scp, the command is exactly the same, except you have to remove the -P. If you've used neither, just know that they're both tools capable of transferring files over SSH. No need to set up anything on your server in order to use them. The syntax for rsync is as follows:
rsync [OPTIONS] user@serverIP_or_name:SourceDirectory_or_filePath Target
Example (filled in):
rsync -P [email protected]:/home/vashiru/rancher-backup-2021-05-28.tar.gz .
This will copy the backup from the home directory of my server to the current directory my terminal is pointed at.
2. Creating a Persistent Volume for BRO
For this guide I'll assume you don't have access to an S3 compatible object store that BRO can use to store and retrieve back-ups. If however you do, and are able to use that, great, you can skip this step if you prefer and move on to Installing backup-restore-operator.
If you don't have an S3 compatible storage, we'll have to first create a Persistent Volume for BRO to store the backups.
- Go to your cluster overview and click on the
localcluster. Ourlocalis the cluster that Rancher uses under the hood and it itself is installed in.
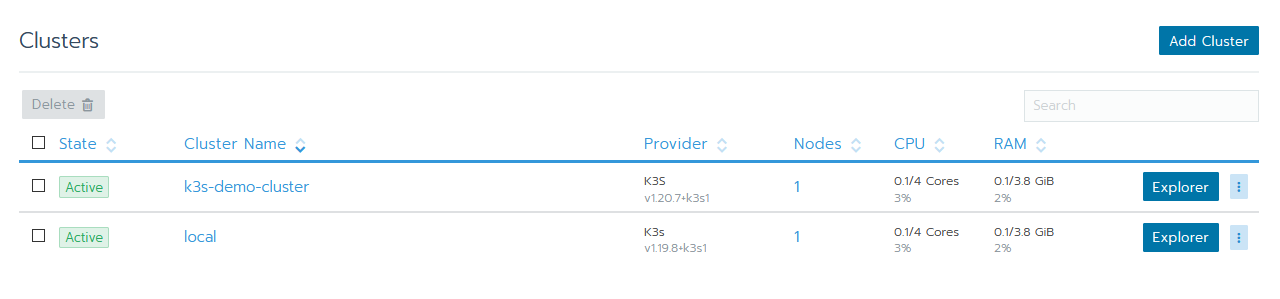
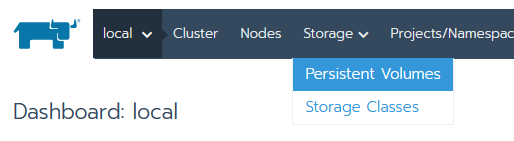
- You should see your dashboard, in the top bar navigate to Storage → Persistent Volumes
- Click on Add Volume, give it the Name
rancher-backup, for the Volume Plugin selectHostPath, default capacity of10 GBis fine (it'll be a couple MB only). For Path on the node select/rancher-backupand for The path on the node must be select the optionA directory, or create if does not exist.
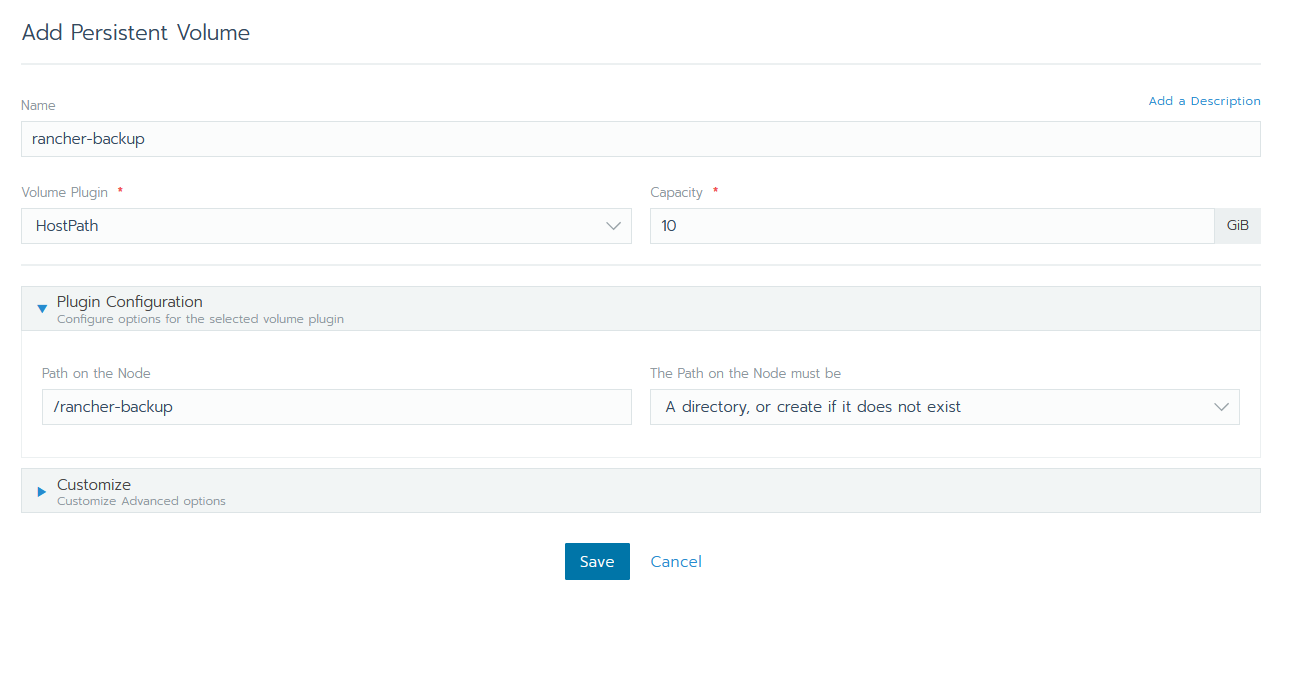
Important: Because Rancher as a single node docker container runs a K3S single node cluster inside the Docker container, Path on the Node means something different here than you’d expect from the name. The Node in this context, is not your host system, but rather the container in which Rancher itself is running This means that right now, anything BRO would write to it, will be lost once container gets removed. Because of this, we'll have to copy the back-up out of the docker container later on in order to use it for the migration.
(Yes, alternatively you could bind-mount a folder on the host to the directory in this container. That way it'll write directly to the hard disk of your node, feel free to do so).
3. Installing backup-restore-operator
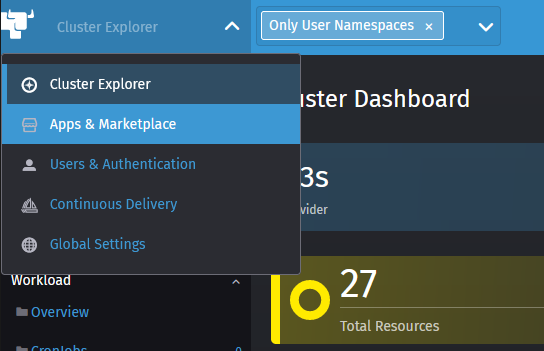
Installing the backup-restore operator is very straight forward. It comes as an App that you install into your Local cluster through the Market Place in Cluster explorer.
- Go to your (global) cluster overview and click on Explorer behind the
localcluster.
- Open the menu on the top left and select Apps & Marketplace
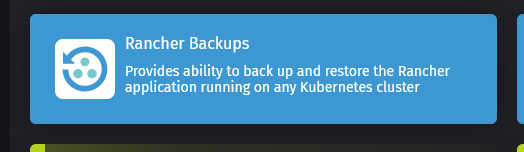
- Locate the Rancher backups chart and open it
- You'll be greeted with the following screen (though a slightly newer version, don’t worry, that’ll still work with this version of Rancher). On the left side, select Chart options
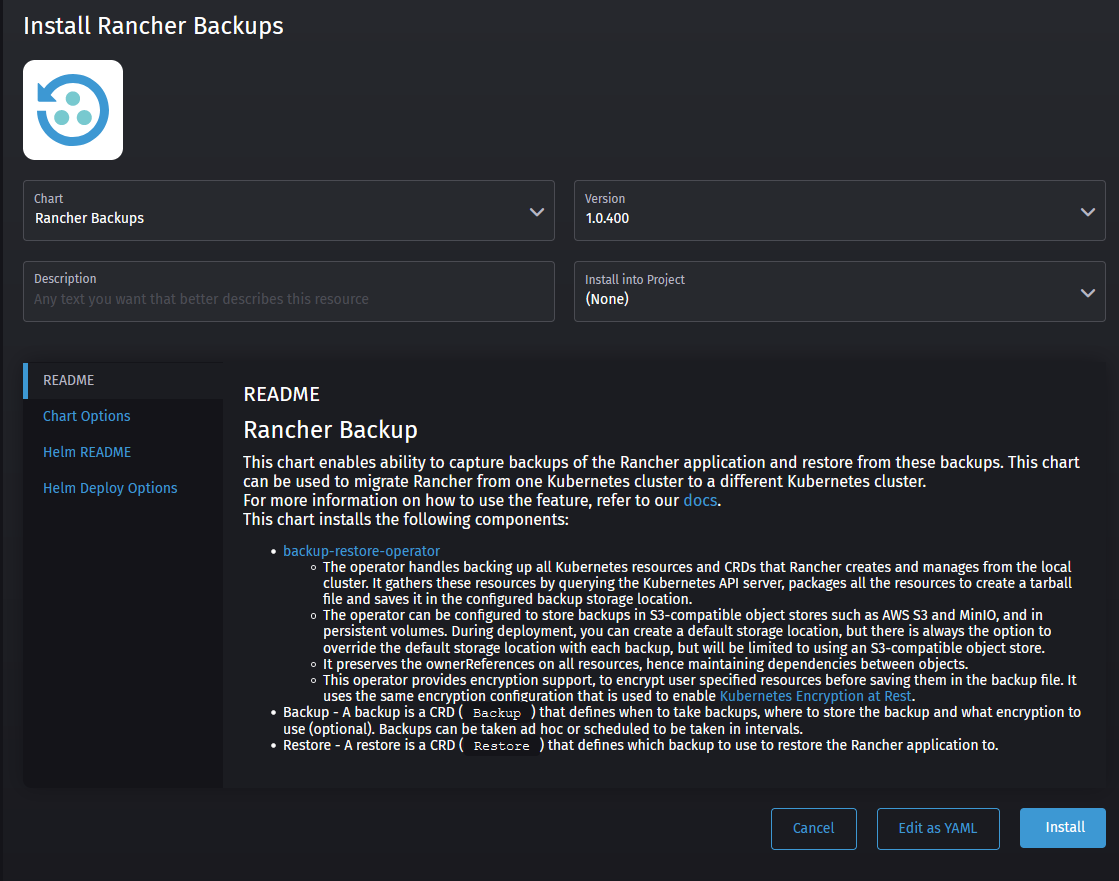
- If you want to use your S3 compatible storage, this is where you would enter your credentials for it as well as any CA certificates in case it's self-signed. If you're using Minio, the default bucket region is:
us-east-1. More info about using an S3 bucket can be found in the Racher docs.
If not, select the Use an existing persistent volume option and select our previously created rancher-backup PV as follows:
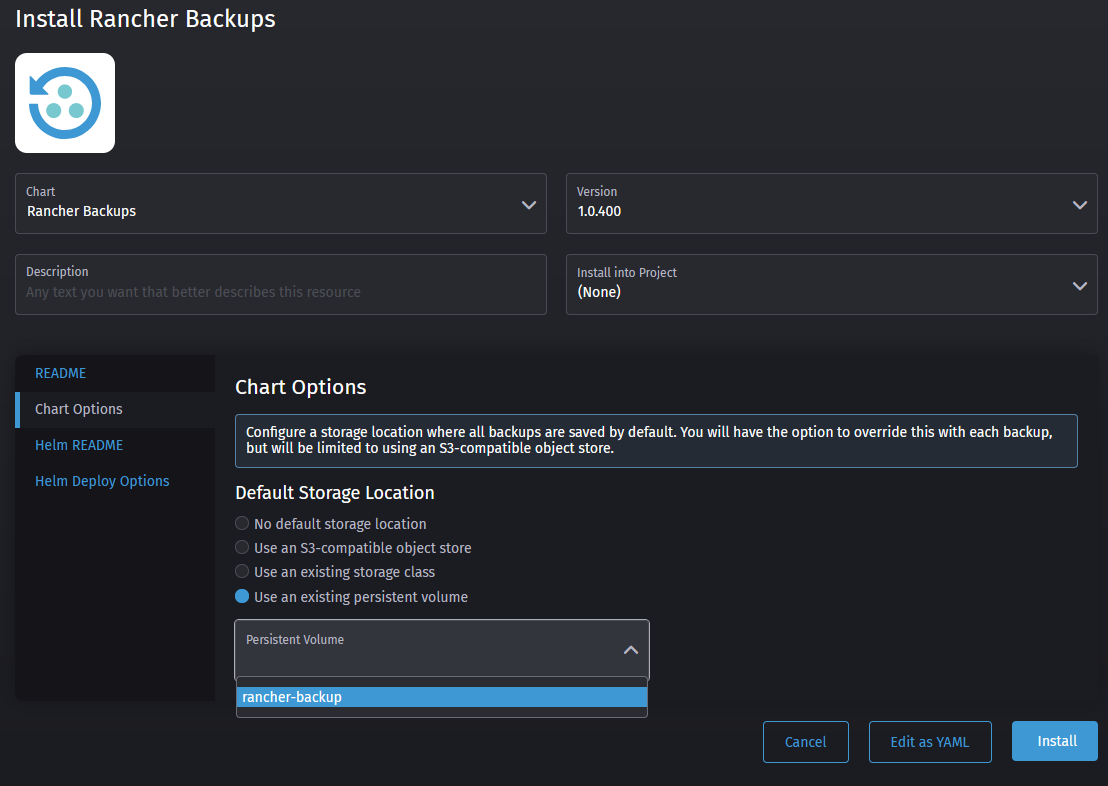
- Click install and wait for the installation to finish. It'll install two things: first the rancher-backup-crds and secondly rancher-backups. CRDs are custom resource definitions, these are extensions to the kubernetes API. Rancher-backup uses these to create the backups and restore them.


4. Creating a one time backup using BRO
After we've installed BRO, it's time to create our back-up. This is the back-up we'll be using to actually migrate the cluster in the following steps.
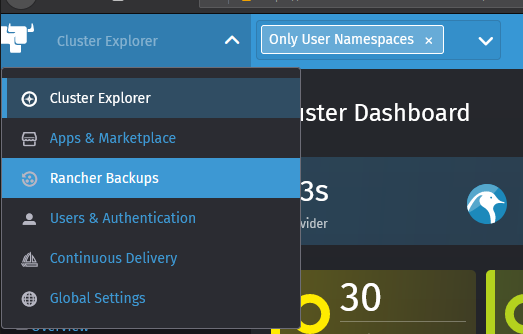
- Navigate to the Cluster Explorer of your
localcluster like we did before and open the menu on the top left. You'll notice it has a new option called Rancher Backups, that's the one we want. (if you don't see it, refresh the page).
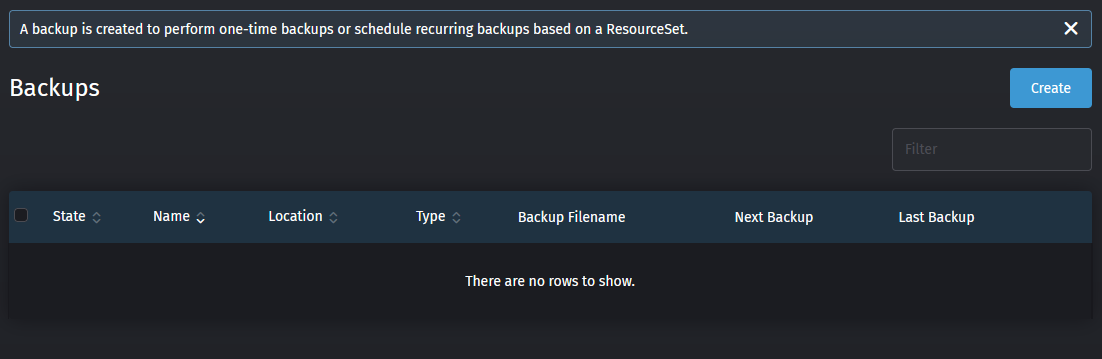
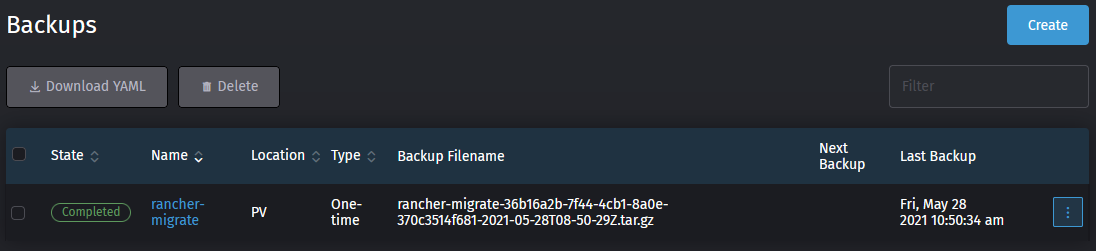
- You'll see that there are currently no back-ups present, so let's go ahead and create one using the Create button
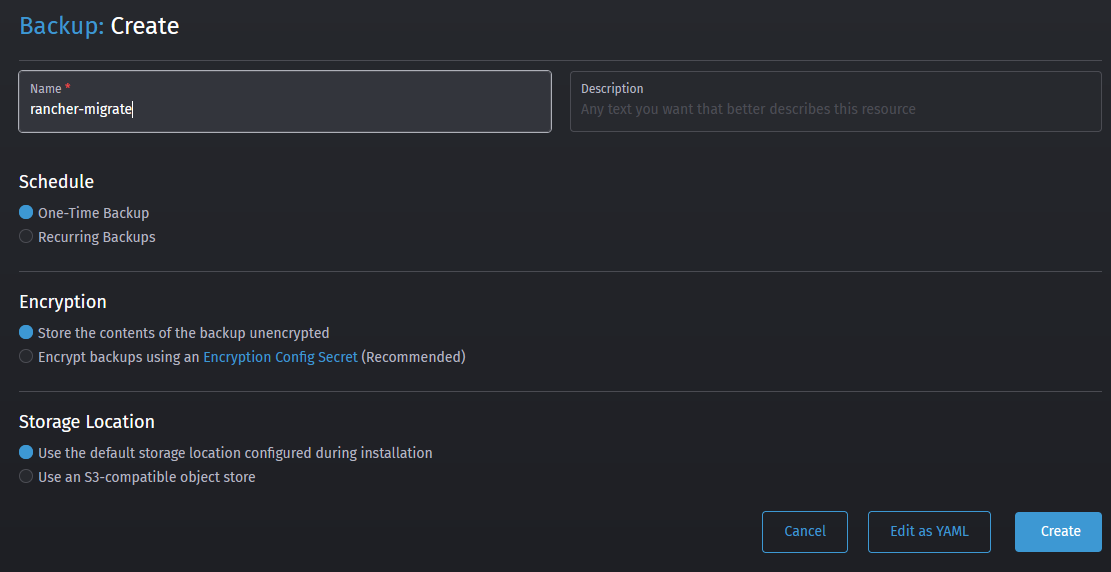
- Let's give our back-up a name, let's say
rancher-migrate, enter a description if you like, set Schedule toOne-Time Backupand set Encryption toStore the contents of the backup unencrypted(we'll make it easy on us for ourselves here). You can leave the Storage location set toUse the default storage location configured during installation. If you're using an S3 bucket, no need to enter your credentials again here. After you've done all that, go ahead and click on Create to create the back-up job.
- After you hit create, you should be returning to the to the back-ups overview. Your rancher-migrate back-up job should be visible and after a few seconds / minutes the state should change to completed and a filename should show up.
Important: Copy the filename to a safe location, you'll need it later.
Note: Despite the backup-restore-operator looking very straight-forward, the rest of the procedure is actually a bit tricky. You can't just go ahead, install a new cluster, slap Rancher on it along with BRO, and trigger a restore from the UI on the new cluster. This will cause issues issues and have your restore turn out unsuccesful. Talking from experience here.
5. Extracting the BRO back-up from the container for migration
If you've used the persistent volume method from this guide to perform your back-up, you'll have to perform this step. If you've used an S3 bucket, you can skip this entirely. If you used a different StorageClass, go download your back-up from there.
As mentioned earlier, Rancher uses a K3S cluster inside it's Docker container in order to run, causing the HostPath PV not to write to the host, but to the storage inside the container. This means we'll have to extract the back-up from the container, in order to use it for our migration.
Luckily docker has made it very easy to do so.
- SSH into your host
- Find your container or container-id using the command
sudo docker psfor me that would be228d9abea4f4ordistracted_ride

- Use the following command to copy the back-up from inside the container to a directory on your host.
sudo docker cp <container-name>:<path_from_pv>/filename_of_backup.tar.gz .
In my case that would be:
sudo docker cp distracted_ride:/rancher-backup/rancher-migrate-ceee0baa-0c4a-4b25-b15e-e554aa28f705-2021-06-01T21-04-31Z.tar.gz .
- You can check you've successfully extracted it using
ls -lh

- Just like before, let's copy this file over to our local machine using rsync, just to be safe. This step is also required if you'll be using a new cluster rather than your current host for your new Rancher installation. Do so by exiting your current host and retrieving the file with rsync.
rsync -P [email protected]:/home/vashiru/rancher-migrate-36b16a2b-7f44-4cb1-8a0e-370c3514f681-2021-05-28T08-50-29Z.tar.gz .

Take note of this filename, as you'll be needing it later in order to perform the restore.
6. Shutting down the the current Rancher docker container
Now that you've created a back-up of the current rancher installation and you've secured it to your local machine for the migration, we can go ahead and shutdown the current Rancher installation. Don't worry, all workloads in downstream clusters will continue to run as normal.
- SSH into your host
- Find your container or container-id using the command
sudo docker psfor me that would be228d9abea4f4ordistracted_ride

- Shutdown the current rancher container using
sudo docker stop <container name>, so for me that would besudo docker stop distracted_ride. If you want you can validate it's been shutdown by runningsudo docker ps -a, which will list all containers, including stopped ones and you'll see it's status has been changed to exited.

With the back-up out of the way, we're about halfway there. From here on it's just a matter of setting up a Kubernetes cluster, preparing it for the restore, restore the back-up and bring Rancher back online. This might sound daunting at first, but I'll walk you through it.
7. Picking an appropriate new Kubernetes cluster
In order to perform this migration, we're going to need to create a cluster for our Rancher installation to run on. But before we do this, let's take a moment to take a step back. Up until now you've been running Rancher as a single node docker container. Whether this came to be due to budgetary reasons, hardware constraints or just a short term solution gone permanent, this is a good moment to reconsider if a single node is still sufficient for your use-case.
If Rancher being available for you and perhaps other people is vital to your day to day operation, I would recommend setting up a highly available cluster (as does Rancher labs for production workloads). However, if Rancher having 100% uptime isn’t a concern for you (in my experience a single node K3s cluster is very robust on it’s own) a single node cluster might (still) be plenty for you.
The last thing to consider consider is the future of your use-case. A single node cluster might just work for you now, but you may want to turn that in a highly available cluster down the line. If you feel like that's the case for you, you might want to look more closely at the various options available below. If the future is uncertain at this point, don’t worry, you can always migrate your cluster again using this guide.
I've listed a couple of options for Kubernetes clusters based on K3s and RKE, along with links to the documentation on how to set them up. Both K3s and RKE are fully CNCF certified Kubernetes distributions, meaning they're fully compatible with other (Kubernetes) distributions and can utilize all the features. The main difference are the way you setup / update your cluster and the fact that K3S has had some in-tree storage drivers and cloud provider drivers stripped out of it.
Single node cluster options
- K3S cluster using the embedded SQLite database - Lightweight - can NOT be scaled to HA later, for the sake of simplicity, this will be the focus of this guide.
- K3S cluster using the embedded etcd datastore - Resource heavy: requires a fast SSD and lots of memory due to etcd - can be scaled to a HA cluster later. If you still want this option, follow along with the installation below, you'll only have to change 1 parameter.
- K3S cluster using an external MySQL/Postgresql/etcd datastore - Lightweight using MySQL/Postgresql, resource heavy with etcd, but can all be scaled to a HA cluster later.
- RKE cluster using embedded etcd datastore - requires a very fast SSD and lots of memory due to etcd, can be scaled to a HA cluster later
Highly available cluster options:
- 3, 5, 7 etc. node K3s cluster using the embedded etcd datastore - Resource heavy: requires a fast SSD and lots of memory due to etcd. Etcd requires quorum, so only supports an uneven number of nodes.
- 2-3 node K3s cluster using an external MySQL/Postgresql/etcd datastore - Lightweight using MySQL/Postgresql, resource heavy with etcd. Because the datastore is external, Rancher itself would already run HA on 2 nodes instead of 3. (Note that it's only truly fully HA if your database is also HA).
- 3, 5, 7 etc. nodes RKE cluster using embedded etcd datastore - requires a very fast SSD and lots of memory due to etcd, can be scaled to a HA cluster later
If you decide one of the K3s options is best suited for your use-case, you can follow along with the next step 'setting up a K3S cluster for Rancher'. Apart from setting up any Mysql/Postgres/etcd external databases, I'll cover which flags to change to use them.
8. Setting up a K3s cluster for Rancher
You've chosen to have your new Rancher installation to run on a Kubernetes cluster based on K3s, excellent choice. There are a couple of ways to install K3s:
- Install script from Rancher Labs - Manual SSH into the hosts for installation
- k3sup - Installs K3s over SSH
- k3d - Multi-node K3s cluster in Docker containers
It's important to note that K3s, out-of-the-box, doesn't use Docker. Instead it used the containerd container runtime. Containerd is actually fully compatible with Docker, as containerd is what Docker already uses under the hood, hidden by the fancy Docker CLI. If however you prefer to keep running your containers inside Docker, that's possible with all 3 options, not just k3d.
For this guide, we'll be using k3sup to install K3s. It's my preferred way of doing so as it will automatically download the kubeconfig file to our local machine to access the cluster. Saving us a few steps.
Important: If you're installing Rancher on a K3s cluster running on Rasbian Buster, you'll have to follow these steps to switch to legacy ip tables. ****If your cluster is Alpine Linux based, please follow these extra steps.
- Prepare the node(s). If you’re not using the
rootaccount to login over SSH andsudofor the account requires any form of authentication (usually password) disable this using using this guide. You can (and probably should) undo this afterwards, it’s just required for k3sup to work). - First download and install k3sup for your platform of choice
- Secondly, and this bit is like magic. We'll be able to install a single node K3s cluster with just 1 command. This command will will install K3s as a single node Kubernetes cluster using
containerdand the embeddedsqlitedatastore. It will also store the credentials of the cluster in the current directory asrancher-cluster.yamlwith the context namerancher. If you'd rather usedocker, prepare for HA, or just want to use an external database in general, check the tweaks below the command.
k3sup install --ip=<ip-of-first-node> --user=<username> --k3s-channel=v1.20 --local-path=rancher-cluster.yaml --context rancher
Important: Kubernetes v1.20.x is the latest supported version of Kubernetes by Rancher v2.5.0. Hence it’s important to tell the installation to use this version rather than the latest v1.22.5 of K3s.
Tweaks
- Q: I want to use Docker instead of containerd
Add-k3s-extra-args='--docker'behind the command. I would recommend using containerd though as the k3s-uninstall.sh script works better with it, but if you want to use docker you can. Just note that if you ever decide to uninstall k3s, you'll have to manually stop and remove the workloads in docker. - Q: I want to use an external Mysql/Postgresql/etcd database as datastore
Add--datastore="sql-etcd-connection-string"to the command. Check the k3s documentation for the format of the string. - Q: I want to use the embedded etcd database for the HA setup
Add--clusterto the command to replace the embeddedSQLitewithetcdand start K3s in clustering mode
-
After K3sup finishes installing our cluster, we want to check everything went correctly. Because we stored our
kubeconfigin the current directory, we can't just runkubectl get nodesbecause it will look for our config in~/.kube/config. So in order to fix that for this terminal session, run the following command:export KUBECONFIG=${PWD}/rancher-cluster.yaml. -
Now verify your cluster has been installed correctly using
kubectl get nodes. You should get an output like this:

If it says NotReady, wait a few seconds/minutes, run kubectl get nodes again.
Congratulations, you've just installed a single node Kubernetes cluster! 🎉
Important: If you plan on going with a HA setup, proceed with the rest of the first, then add the other nodes afterwards.
9. Preparing the cluster for restore
Before we can proceed to restore the BRO-back-up (rancher-migrate....tar.gz), we need to prepare our cluster. Preparing the cluster will be done through the following steps
- Installing cert-manager (required by Rancher)
- Creating a HostPath Persistent Volume and placing our back-up in in
- Installing backup-restore-operator
For these steps we're going need kubectl and helm v3.2.x or higher. So if you hadn't installed helm up until this point, please do so now.
Important: Do NOT install Rancher itself at this point. If you install Rancher before performing the restore, it will fail. You'll end up with duplicate resources inside the datastore that cause all kind of issues.
9.1 Installing cert-manager
- Make sure you use the same terminal session as you did before. By validating you still see the same nodes as before
kubectl get nodes. If not, run theexport KUBECONFIGcommand from earlier to load the right config. - Before we can install cert-manager, we need to tell helm where to find it. In order to do so we'll add the jetstack (cert-manager) helm chart repositories to helm and let it download it's definitions. We can do that with the following 2 commands:
helm repo add jetstack https://charts.jetstack.io
helm repo update
After which you should see helm reload all charts from all the repositories you've added.
cert-managerrequires a few CRDs to be installed before installingcert-manageritself. Technically there's a way to do it by setting a flag on the helm install as well, but last time I did that, it didn't work. So we'll use kubectl for it:
kubectl apply -f https://github.com/jetstack/cert-manager/releases/download/v1.6.1/cert-manager.crds.yaml

Ignore the slight version discrepancy in the picture, the screenshots are slightly older, the guide has been updated to use the latest version.
- Then we install cert-manager itself using helm.
helm install cert-manager jetstack/cert-manager --namespace cert-manager --create-namespace --version v1.6.1
Tip: If you add the --create-namespace flag when installing a helm-chart, it will create it for you as the name suggests. Saving you from having to create it manually with kubectl first.
- Wait for a few minutes and then check that
cert-managerhas installed correctly usingkubectl get pods -n cert-manager. All pods should have a ready 1/1 state. If not, wait a couple of minutes and check again. If they're still not starting, check the logs usingkubectl logs <podname> -n cert-managerto figure out what's wrong.

And that's the first part done, cert-manager is now successfully installed.
9.2 Creating the persistent volume for our restore
Before we can install the backup-restore-operator we have to create a Persistent Volume containing our back-up first. This is because the backup-restore-operator can only restore from a persistent volume, if it's set as the default location upon installation. Otherwise it only supports S3 buckets. This is currently not very clearly documented in the documentation on the Rancher website.
So if you actually used an S3 bucket for your back-up, and will be using that for the restore, you can skip these step and move on with 9.3 Installing backup-restore-operator. If you used a different StorageClass, either grab your backup from there and use the PV method below, or skip to 9.3 Installing the backup-restore-operator and tweak the installation of BRO yourself. For everyone else following this guide, just keep reading.
- First we have to create our Persistent Volume to place our back-up in. This has to be in the same namespace as where BRO is installed, so we'll have to create both upfront. Below you can find the
yamlfile to do so.
Note: For the hostPath I used /home/vashiru/rancher-backup, this is the actual folder in which you'll have to place your back-up on the node. When we tell BRO to use this PV, it will mount that folder to /var/lib/backups inside the container. So because of this, you'll want it to be a separate folder on your node. As such, tweak it to your needs. The path doesn't have to exist on the node yet, we'll create it in the next few steps.
For now, just tweak the path under hostPath to your needs and save the file as rancher-backup-ns-pv.yaml.
---
apiVersion: v1
kind: Namespace
metadata:
  name: cattle-resources-system
---
apiVersion: v1
kind: PersistentVolume
metadata:
  name: rancher-backup
  namespace: cattle-resources-system
spec:
  storageClassName: manual
  capacity:
    storage: 10Gi
  accessModes:
  - ReadWriteOnce
  hostPath:
    path: /home/vashiru/rancher-backup
-
Now apply this file to your cluster using
kubectl apply -f rancher-backup-ns-pv.yaml -
You can validate it's been deployed using
kubectl get pv

-
SSH into your node
-
Create the directory using
mkdir -p /home/vashiru/rancher-backup. The-pflag, in case you didn't know, will automatically create the entire path you specify, including subdirectories. -
If you are re-using the node you previously used to run the single node docker-container on, just copy the
rancher-migrate-<hash>-<timestamp>.tar.gzfile into the/home/vashiru/rancher-backup. Otherwise, usersyncto upload your backup to the new node.
Example:
rsync rancher-migrate-<hash>-<timestamp>.tar.gz 192.168.1.221:/home/vashiru/rancher-backup/
Important: Make sure you used the backup starting with rancher-migrate-<hash>... here. Do NOT use rancher-data-backup, as that's only for restoring single node docker installations.
- Once you've got the backup placed in the right directory, exit from SSH again.
9.3. Installing backup-restore-operator
- Add the
rancher-chartshelm chart repository to helm and update the definitions using:
helm repo add rancher-charts https://charts.rancher.io
helm repo update
- Install the CRDs for the backup-restore-operator using helm:
helm install rancher-backup-crd rancher-charts/rancher-backup-crd -n cattle-resources-system --create-namespace

- Next, we'll have to install the back-up restore operator. If you've been following along with the guide for the Persistent Volume, use option A. If you're using S3, use option B.
A. Persistent Volume Method:
helm install rancher-backup rancher-charts/rancher-backup -n cattle-resources-system --set persistence.enabled=true --set persistence.storageClass=manual --set persistence.volumeName="" --set persistence.size=10Gi
This will tweak a few things in the helm chart values so that the backup-restore-operator will create a Persistent Volume Claim that will bind our Persistent Volume.

B. S3 bucket for restore:
helm install rancher-backup rancher-charts/rancher-backup -n cattle-resources-system

- Validate that the PVC has been able to claim the persistent volume using
kubectl get pv. You should see the following:

The status should be updated to Bound and claim should be bound to cattle-resources-system/rancher-backup-1. If this is not the case, go back to 9.2 and check your steps. If needed uninstall the helm chart and delete the PV. Deleting the PV, because this is a hostPath PV, will not delete your data inside.
10. Restoring the BRO-back-up
Only a couple of steps left. First of those will be the restore itself. The backup-restore-operator automatically monitors the local cluster for any objects that are being created of the Restore kind that use the apiVersion resources.cattle.io/v1. When it detects such an object is being created, it will immediately trigger a restore.
So how do we create this Restore object? After all, it's not like we have the Rancher GUI to manage them. Well once again, we'll use a yaml file to create this and trigger the restore.
- Depending on whether you'll be restoring from a PV or an S3 bucket. Pick one of the options below depending on how you want to trigger the restore and follow the steps there. If you are following along with this guide and used the persistent volume, go for Option A. If you want to restore from an S3 bucket, pick option B.
A. Restore from the persistent volume
Replace the filename with the one that's applicable to your and save it as restore.yaml.
apiVersion: resources.cattle.io/v1
kind: Restore
metadata:
  name: rancher-migrate
spec:
  backupFilename: rancher-migrate-ceee0baa-0c4a-4b25-b15e-e554aa28f705-2021-06-01T21-04-31Z.tar.gz
B. Restore using an S3 bucket
The S3 restore requires a secret to be present for the S3 credentials, so the sample below contains both the secret, as well as the restore object in it. Replace all <> brackets with the values applicable to you (removing the <> of course) and save it as restore.yaml.
Note: The secret is specified as stringData, this means you can enter your accessKey and secretKey as plaintext. Normally you'd use data instead of stringData, in which case they'd have to be base64 encoded.
Friendly reminder: the default region for buckets created by Minio is us-east-1
---
apiVersion: v1
kind: Secret
metadata:
  name: s3-creds
  namespace: cattle-resources-system
type: Opaque
stringData:
  accessKey: <your-access-key>
  secretKey: <your-secret-key>
---
apiVersion: resources.cattle.io/v1
kind: Restore
metadata:
  name: rancher-migrate
spec:
  backupFilename: rancher-migrate-ceee0baa-0c4a-4b25-b15e-e554aa28f705-2021-06-01T21-04-31Z.tar.gz
  prune: false
  storageLocation:
    s3:
      credentialSecretName: s3-creds
      credentialSecretNamespace: cattle-resources-system
      bucketName: <your-bucket-name>
      folder: <folder-on-bucket>
      region: <bucket-s3-region>
      endpoint: <hostname-to-bucket-so-without-http>
-
Apply the your yaml file to the cluster using
kubectl apply -f restore.yaml -
Use
kubectl get pods -n cattle-resources-systemto find out the name of your rancher-backup pod

- Use
kubectl logs <pod-name> -n cattle-resources-system -fto monitor the logs of the container for errors. You'll see it picks up the restore and starts to process it:
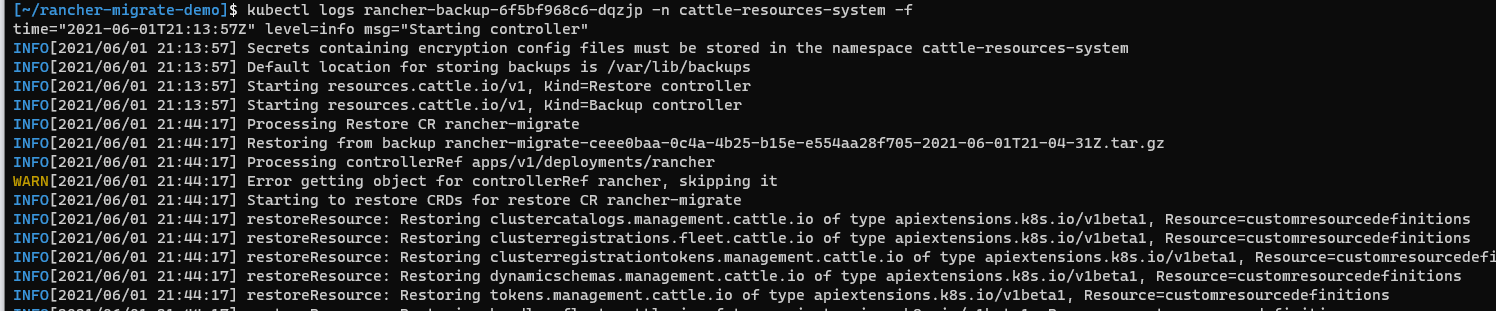
- After a few minutes, it will finish with the message
Done Restoring. You might see aWARN[2021/06/01 21:46:33] Error getting object for controllerRef rancher, skipping it, just before the end, you can ignore this.

Great! Our datastore has been restored time to open our browser and... Nope, not yet. Two more steps to go. The datastore has been restored, but this doesn't restore our deployment of Rancher itself. We'll still have to install Rancher manually. Once installed it will automatically detect the data already present in the datastore and use that instead of triggering a first setup procedure. Also there's currently a bug that causes the local-path-provisioner to fail, so we'll have to fix that.
11. Fixing local-path-provisioner
There's currently an issue that after you restore Rancher, the local-path-provisioner will start to fail. Luckily this can easily be remediated. This might be fixed by the time you use this guide, so we'll validate if this is the case first.
- Let your cluster settle for a bit
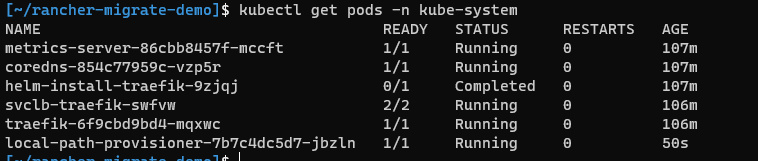
- Use
kubectl get pods -n kube-systemto check on ourlocal-path-provisionerpod. Your output will look something like this:

- Check the logs of that pod using
kubectl logs <pod-name> -n kube-system. If it returns the error below, you've been affected by kubernetes-sigs/kubespray #7321 :
time="2021-06-01T22:51:44Z" level=fatal msg="Error starting daemon: invalid empty flag helper-pod-file and it also does not exist at ConfigMap kube-system/local-path-config with err: configmaps \"local-path-config\" is forbidden: User \"system:serviceaccount:kube-system:local-path-provisioner-service-account\" cannot get resource \"configmaps\" in API group \"\" in the namespace \"kube-system\": RBAC: [clusterrole.rbac.authorization.k8s.io](http://clusterrole.rbac.authorization.k8s.io/) \"local-path-provisioner-role\" not found"
- If you're affected, save the following
yaml(credits to ledroide) to your disk askrole-local-path.yaml:
---
apiVersion: rbac.authorization.k8s.io/v1
kind: Role
metadata:
  name: local-path-provisioner-workaround
  namespace: kube-system
rules:
- apiGroups:
    - ''
  resources:
    - configmaps
  verbs:
    - get
    - list
    - watch
---
apiVersion: rbac.authorization.k8s.io/v1
kind: RoleBinding
metadata:
  name: local-path-provisioner-workaround
  namespace: kube-system
roleRef:
  apiGroup: rbac.authorization.k8s.io
  kind: Role
  name: local-path-provisioner-workaround
subjects:
- kind: ServiceAccount
  name: local-path-provisioner-service-account
-
Apply it to your cluster using
kubectl apply -f role-local-path.yaml -
Restart the deployment using
kubectl rollout restart deployment/local-path-provisioner -n kube-system

- Run
kubectl get pods -n kube-systemto validate that the issue has been resolved
12. Installing Rancher on your new cluster
Almost done. This is our last step before having our beloved Rancher installation up and running, ready to manage our clusters again. We'll do some housekeeping after, but this is the last step before your cluster will be back online.
- If you are using a new node for your cluster (ergo you switched IP addresses) update your DNS records now and have them point to your new node. If you're repurposing your old node, you can skip this.
- Add the
rancher-stablehelm repo to helm. This is different than the general rancher helm chart you installed earlier. You can add therancher-stablerepo using:
helm repo add rancher-stable https://releases.rancher.com/server-charts/stable
helm repo update
- So before we install Rancher, we have one more decision to make. How is the https certificate going to be handled? Will you let Rancher self-generate it's TLS certificate, use let's encrypt for a valid certificate or are you bringing your own? Pick your option down below and follow the required steps:
IMPORTANT: your hostname MUST be the same as it was on the single node docker installation. This is what your downstream clusters will be looking for to (re)connect with Rancher.
A. Rancher generated (self-signed) certificate
Replace the hostname (including the brackets) to the one of your rancher cluster (without protocol etc.) and run the following command:
helm install rancher rancher-stable/rancher --version=2.5.8 --namespace cattle-system --create-namespace --set hostname=<replace-with-your-hostname> --set replicas=1 --set ingress.tls.source=rancher
Note: We're setting replicas to 1 because we only have 1 node in our cluster right now. If you’re switching to a HA cluster later on, you can update the replica count later to reflect the number of nodes.
B. Use let's encrypt (cert-manager) to generate valid certificates (easiest)
Replace the hostname and e-mail (including the brackets) to the ones applicable to your rancher cluster and run the following command:
helm install rancher rancher-stable/rancher --version=2.5.8 --namespace cattle-system --create-namespace --set hostname=<replace-with-your-hostname> --set replicas=1 --set ingress.tls.source=letsEncrypt --set letsEncrypt.email=<replace-with-your-email>
Note: We're setting replicas to 1 because we only have 1 node in our cluster right now. If you’re switching to a HA cluster later on, you can update the replica count later to reflect the number of nodes.
C. Rancher generated (self-signed) certificate
Replace the hostname (including the brackets) to the one of your cluster and run the command below. If you're using a private CA, append --set privateCA=true to the command. After running it, follow "Adding TLS Certificates" to upload them to Rancher.
helm install rancher rancher-stable/rancher --version=2.5.8 --namespace cattle-system --create-namespace --set hostname=<replace-with-your-hostname> --set replicas=1 --set ingress.tls.source-secret
Note: We're setting replicas to 1 because we only have 1 node in our cluster right now. If you’re switching to a HA cluster later on, you can update the replica count later to reflect the number of nodes.
Install finished
Once you’ve ran the helm command, whichever option you’ve picked, once finished should look something like this:

-
Whilst Rancher is deploying, take note of all the
--setoptions you used in the previous step. You'll be needing those in the future when you upgrade your Rancher installation. (If you ever need to retrieve them you can usehelm get values rancher -n cattle-system > rancher-values.yamland it’ll export it to rancher-values.yaml). -
Check up on the status of installation using:
kubectl -n cattle-system rollout status deploy/rancher. After a couple of minutes (depending on your host could be 15-20 minutes) it should start informing you that the replicas are becoming available. If you seeerror: deployment "rancher" exceeded its progress deadline, you can check the status again usingkubectl -n cattle-system get deploy rancher.

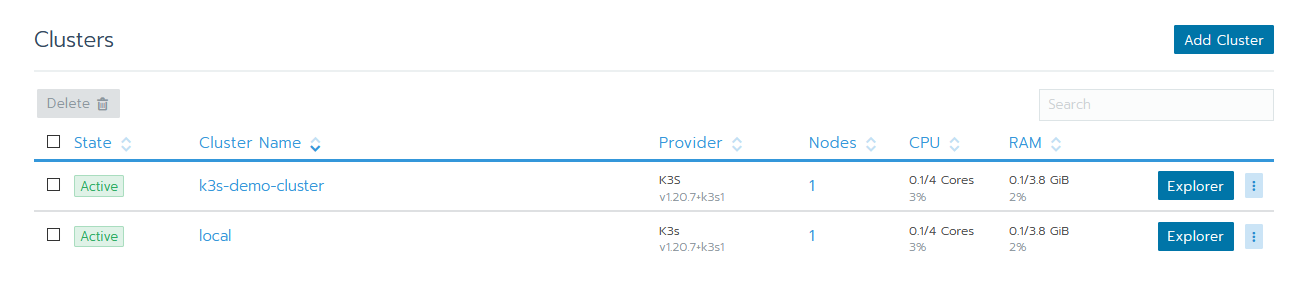
- Once it's finished, go into your browser and navigate to your Rancher url. You should see the Rancher GUI appear. In case of Firefox, you might get an SSL error first if you used self-signed certificates and they changed, just refresh and it'll go through. If you're prompted with a login, the credentials are the same as they were before. Once signed in you should see your clusters.
NOTE: It's perfectly normal if you see some of your clusters switch a couple of times between Active and Unavailable at this point. After a few minutes, they should settle down and all show up as available.
- I've noticed that after migrating a cluster like this, the
rancher-webhookpod might get into an infinite restart loop simply logging "unauthorized". The solution for this is deleting the actual pod. Doing so will trigger a clean restart after it will work. You can easily remove this pod with the following command:
kubectl get pods -n cattle-system | grep 'rancher-webhook' | awk '{print $1}' | xargs kubectl delete pod -n cattle-system
And with that out of the way, congratulations! You've just successfully migrated your Rancher Single Node Docker install to a single node K3S cluster.
12. Cleaning up
During this guide you've created a PV and installed the backup-restore-operator into your cluster in a way that you're probably not going to want to keep using it. In order to remove those, we can run a few simple commands:
helm uninstall rancher-backup -n cattle-resources-systemhelm uninstall rancher-backup-crd -n cattle-resources-systemkubectl delete pv rancher-backup
13. Extra: Update Rancher to 2.6.3
So we’ve migrated Rancher to our shiny new Kubernetes cluster, but you can’t help but notice that the versions we’ve migrated to are slightly outdated. Well, you’d be correct. This guide has actually been written a little while ago and I hadn’t gotten around to publishing it yet. Fortunately this gives me the opportunity to teach you how to update and maintain your Rancher and K3s installation. So without further a-do, let’s get updating.
What we’ll be doing
- Re-install Backup Restore Operator to take a back-up, this time it will correctly function with hostPath
- Take a back-up
- Update Rancher using Helm along with the values we used to install it
- Update K3s
Important: If you manage any downstream clusters that run on K3s (clusters you control from inside Rancher): There’s an issue updating the Kubernetes version of those in Rancher 2.6.0-2.6.2 when upgrading Rancher from 2.5.x. It will fail due to it not being able to find a service-account it’s looking for. This should be fixed in Rancher 2.6.3 (which was released 4 weeks ago), but if you happen to run into this issue, like I did, the solution can be found in this ticket.
Steps:
-
Re-install Rancher Backup Restore Operator and take a back-up like we did in step 2-4.
-
SSH into your Rancher host machine and confirm the back-up is present on the host in the directory that you specified, in this guide
/rancher-backup. -
When upgrading a deployment via helm, you always have to (re-)specify the values you passed for installation. Because upgrading could be adjusting the config or changing the version. The easiest way to do this is to retrieve the old values and save them to a yaml file using
helm get values rancher -n cattle-system > rancher-values.yaml.Note: Helm uses the context from your kubeconfig file. So if you’re updating later down the line, make sure you’ve got the right context loaded. If you’ve closed your terminal since the earlier procedure, check out section 8 step 3 for a refresher. (And perhaps consider merging your kubeconfig. Also I can recommend the plugins kubectx and kubens for switching between contexts and namespaces).
-
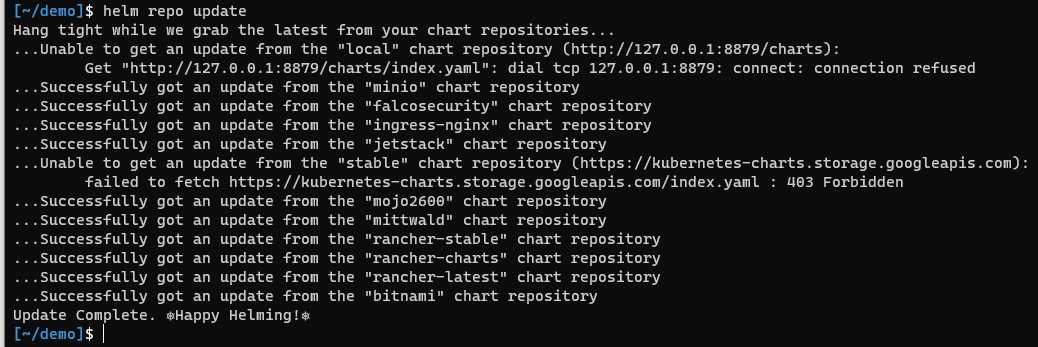
In order to update the Rancher deployment, we first have to make sure our helm repos are actually up to date. We can update these using
helm repo update. -
Once you’ve done that you can upgrade your Rancher deployment using
helm upgrade rancher rancher-stable/rancher -n cattle-system -f rancher-values.yaml --version 2.6.3this will upgrade your Rancher deployment to Rancher v2.6.3 using the values you provided during the original installation. If you want to test your command before running it you can add--dry-runto make sure it’s all valid.
Steps to take next
There are a couple of things I would suggest you do next:
Take the K3s class if you're new to K3s
If you just want to keep using your Rancher installation as a single node cluster, you can proceed in doing so. If this is your first time dealing with K3s and want to learn more about it (including backup and restore) I can recommend the free "Up and Running: K3s" class in the SUSE & Rancher community.
Set up a cronjob to restart K3s every 14 days to keep its certificates fresh
K3s uses certificates internally that have a validity of 365 days. K3s renews those certificates on restart when they're within 90 days of expiration. The easiest way to realise renewing these, is to create a cronjob to restart K3s. Don't worry, you'll Rancher workload will actually keep running while you do this. The K3s control plane can restart independent from it's workloads.
In order to create a cronjob to restart K3s every 14 days (this is in order to ensure multiple attempts before the 90 days are over in case of failure), use use the following clusters.
- SSH into your cluster
- Open crontab using
sudo crontab -e, if it asks for an editor and don't know what to do, picknano. - At the bottom of the file, add the following line:
0 3 */14 * * sudo service k3s restart
-
For
nano: HitCtrl+X, hityfollowed by enter to save the changes -
Your K3s will now restart every 14 days at 3 AM.
Add your other nodes and make your setup fully HA
If you've followed this guide with the intention of migrating to a HA setup, now is the time to start adding your nodes to the cluster. Depending on your option, pick one of the following links for the next steps:
- K3s: Create a multi-master (HA) setup using an external SQL database
- K3s: Create a multi-master (HA) setup using the embedded etcd
- RKE: Add your 2nd node, run
rke up, repeat for the third.
Once you've done that, you got a multi-master setup, but your kube-config is still pointing at only one node at a time. Also your downstream clusters are currently getting round-robin DNS, which will fail if one of the nodes actually goes down. Depending on where you’ve chosen to host the Rancher installation there are a few solutions for this:
- Create a cloud based TCP loadbalancer that redirects traffic to the individual nodes and detects when they're down
- Install kube-vip as a service type load-balancer and have that target your nodes using a floating IP.
- Install metalLB, create a service type load-balancer and use that to distribute the workloads
Summary
You've just done is migrate your Rancher single node docker installation into a kubernetes cluster. In doing so you've brought upon your cluster the benefits of kubernetes' excellent lifecycle management, as well as the other benefits that come with kubernetes. You've also future proofed your Rancher installation as eventually the docker installation is going to be deprecated.
I hope you found this guide helpful and that successfully migrated your Rancher installation to a Kubernetes cluster. This is the first time I've ever written a guide on anything Rancher / Kubernetes / K3s related so feedback is welcome.

Comments